Repairing window and door screens might seem like a simple task, but having the right tools can make all the difference. Whether you’re dealing with tears, holes, or general wear and tear, knowing which tools to use will not only save you time but also ensure a professional-looking finish. Having spent years tackling home repairs myself, I’ve learned that the right equipment can streamline the process significantly. Let's dive into what you need to get started on your next DIY window and door screen repair project.
Understanding Your Screens
Before we discuss tools, it’s essential to understand the types of screens you may encounter. Window screens are usually made of either fiberglass or aluminum mesh, while door screens often come in similar materials but may also feature retractable options for convenience. Each type will have different repair requirements, so being aware of this will help guide your choice of tools.
Fiberglass screens are lightweight and easy to work with but can be prone to tearing if mishandled. Aluminum screens are more durable but may require more effort to install due to their rigidity. Understanding these fundamentals prepares you for what lies ahead.
Essential Tools for Screen Repair
1. Screen Material
The first tool you’ll need is high-quality screen material. Depending on your specific needs, you can choose from fiberglass or aluminum screening rolls. Fiberglass is generally more affordable and easier to cut and handle, making it suitable for most DIY repairs. On the other hand, if durability is your primary concern — perhaps due to pets or heavy foot traffic — aluminum screening might be worth the investment.
2. Scissors or Utility Knife
Once you've chosen your screen material, you'll need something sharp to cut it down to size. A good pair of scissors can work well for fiberglass screens; however, a utility knife is often preferred when working with tougher materials like aluminum. Using a straight edge as a guide while cutting ensures clean lines and minimizes fraying at the edges.
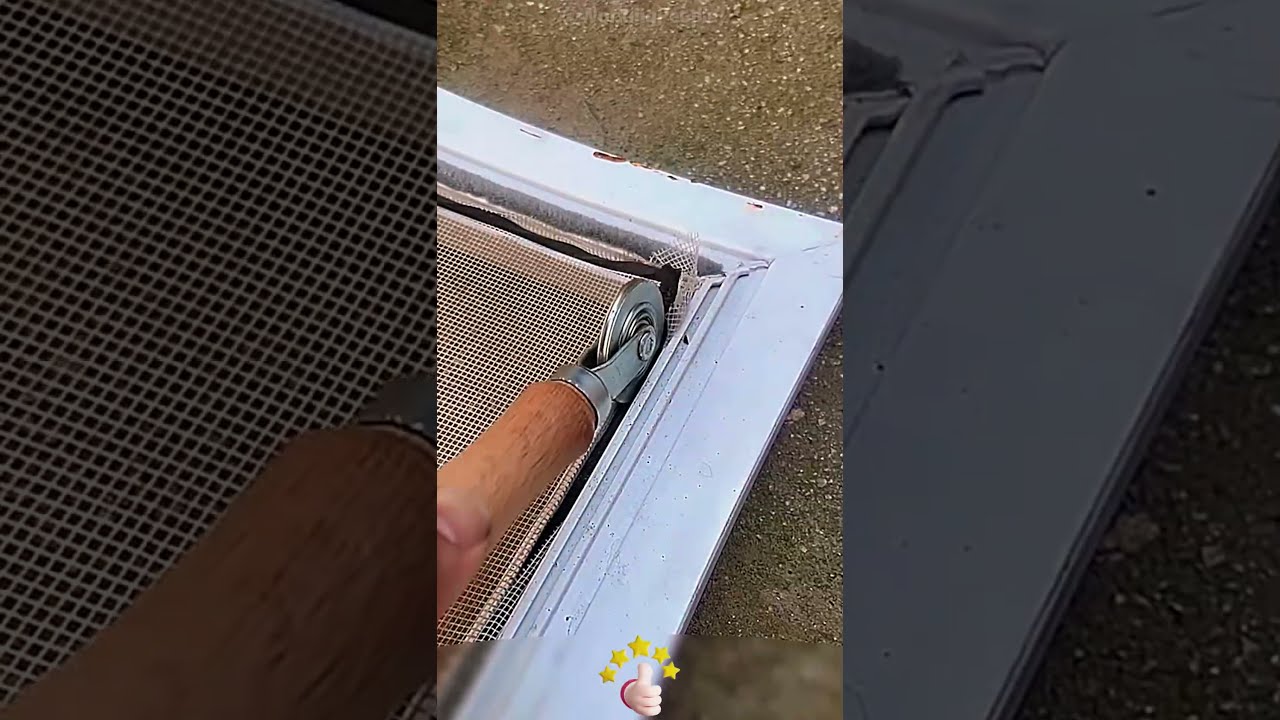
3. Spline Roller
A spline roller is an indispensable tool in any screen repair kit. This handy device helps press the screen material securely into the frame with a spline—a thin rubber cord that holds everything in place. When using this tool, roll it along the edges of the screen after laying it down over the frame; this will help seat both the screen and spline properly.
4. Pliers
Pliers come in handy for removing old spline or adjusting any loose corners once you've begun reassembling your frame. They provide better grip and leverage than fingers alone would allow and make pulling out stubborn staples or nails much easier.
5. Staple Gun
In some cases, especially with wooden frames, using a staple gun can offer additional security in holding your screen in place alongside the spline. It’s particularly useful when dealing with larger frames where tension is crucial.
Optional Tools
While those five tools form the core of any effective window or door screen repair kit, there are other items that could enhance your experience:
- A small brush or cloth: To clean out any debris from inside the frame before starting repairs. Measuring tape: Always handy if you're unsure about dimensions. Safety glasses: These protect against flying debris when cutting materials.
Step-by-Step Repair Process
Now that we’ve covered essential tools let’s look at how you can put them into action effectively:
Remove Old Screen: Start by taking off any existing screen material from your frame using pliers or a flathead screwdriver if necessary.
Clean Frame: Dust off dirt or debris using a small brush or cloth so that new material adheres correctly.
Cut New Screen: Measure out your new screening material against the frame's dimensions and cut accordingly.
Lay Down New Screen: Place your new screen over the frame ensuring it's taut without sagging.
Secure Edges: Use a spline roller to press down on both the screen and spline simultaneously into their respective grooves.
Trim Excess Material: Carefully trim any excess screening along outer edges for a neat finish.
Final Adjustments: If necessary, apply staples around edges for added security—especially helpful on larger frames where tension is a concern.
Install Frame: Place your newly repaired frame back into position within your window or door structure.
This method not only ensures that repairs are quick but also provides an opportunity to reinforce areas that may have been weak previously.
Troubleshooting Common Issues
Even experienced DIYers encounter challenges along the way; here are some common issues you might face during repairs:
- Screen Sagging: If after installation your new screen appears sagging or loose, re-check how tightly it was secured while applying spline. Tears Reappearing: If tears seem prevalent shortly after installation, consider upgrading from fiberglass mesh to aluminum screening which tends to withstand wear better over time. Difficult Removal of Old Spline: Sometimes old spline becomes brittle and difficult to remove; soaking it briefly with warm water can help soften it up before attempting removal again.
These troubleshooting tips come from real-world experiences where minor adjustments saved lengthy redo efforts later on.
Maintenance Tips for Longevity
To ensure that your repaired windows and doors last as long as possible without needing further attention:
- Regularly inspect your screens for signs of wear; catching small tears early prevents bigger problems later on. Clean screens periodically using mild soap solutions followed by rinsing with clear water — never scrub too hard as this can damage materials further! Avoid harsh chemicals near frames as they could deteriorate both wood finishes (if applicable) as well as any adhesive used during assembly processes earlier on.
By incorporating simple maintenance practices into routine home care activities, you'll extend not only lifespan but overall appearance too across all windows/doors outfitted with these protective barriers against pests!
Final Thoughts
Having tackled numerous DIY projects around my own home over several years has taught me one valuable lesson—preparation makes all difference! With just a handful of Daniel Kielb daniel-kielb.com basic yet effective tools at hand plus adherence towards proper techniques throughout each step involved in repairing window & door screens leads towards successful outcomes everyone desires when looking for ways maintain their residences’ functionality while enhancing aesthetics overall too!
So whether you're facing minor rips from playful pets or simply needing an upgrade due age-related deterioration—don’t shy away from diving into these rewarding home improvement tasks yourself! With practice comes efficiency leading ultimately towards mastery; soon enough even daunting projects won’t seem quite so challenging anymore!